How to Make PowerPoint Loop?
PowerPoint has some impressive automation features that are unknown to most users. Do you know PowerPoint allows self-running presentations with no manual input? Yes, you can loop a presentation or specific slides for automatic display.
Here is how to make a PowerPoint loop: go to Slide Show >> Setup Slide Show >> Show Options >> Loop Continuously until ESC.
Digital signage, kiosks, and events require continuous presentation of the same data. How can you make a PowerPoint loop so that you don’t have to change slides again and again? From the benefits of looping slides to how to loop a presentation, this guide covers every aspect for readers.
What is Loop in PowerPoint Presentation?
As the name suggests, slides will run in a continuous loop. Every feature of the tool is meant to add value and make content delivery more effective. When explaining a complex concept to the audience, breaking it down into steps will help set the pace. With looping a presentation, every next slide will explain a specific step.
The presenter does not have to worry about pacing the slides, and the PowerPoint looping feature automates the slide display in a sophisticated way.
Every slide has different attributes that the user can control and change. The sequence of slides, the timing of each slide, and how many times you want to play the presentation can all be adjusted.
How to make a PowerPoint Presentation Loop?
Do you want the presentation to restart once all slides are complete? By following the given steps, one can automate the presentation slides. Make sure you keep content short and precise for every slide. As the slides will appear for a short instance, viewers should be able to grasp the idea.
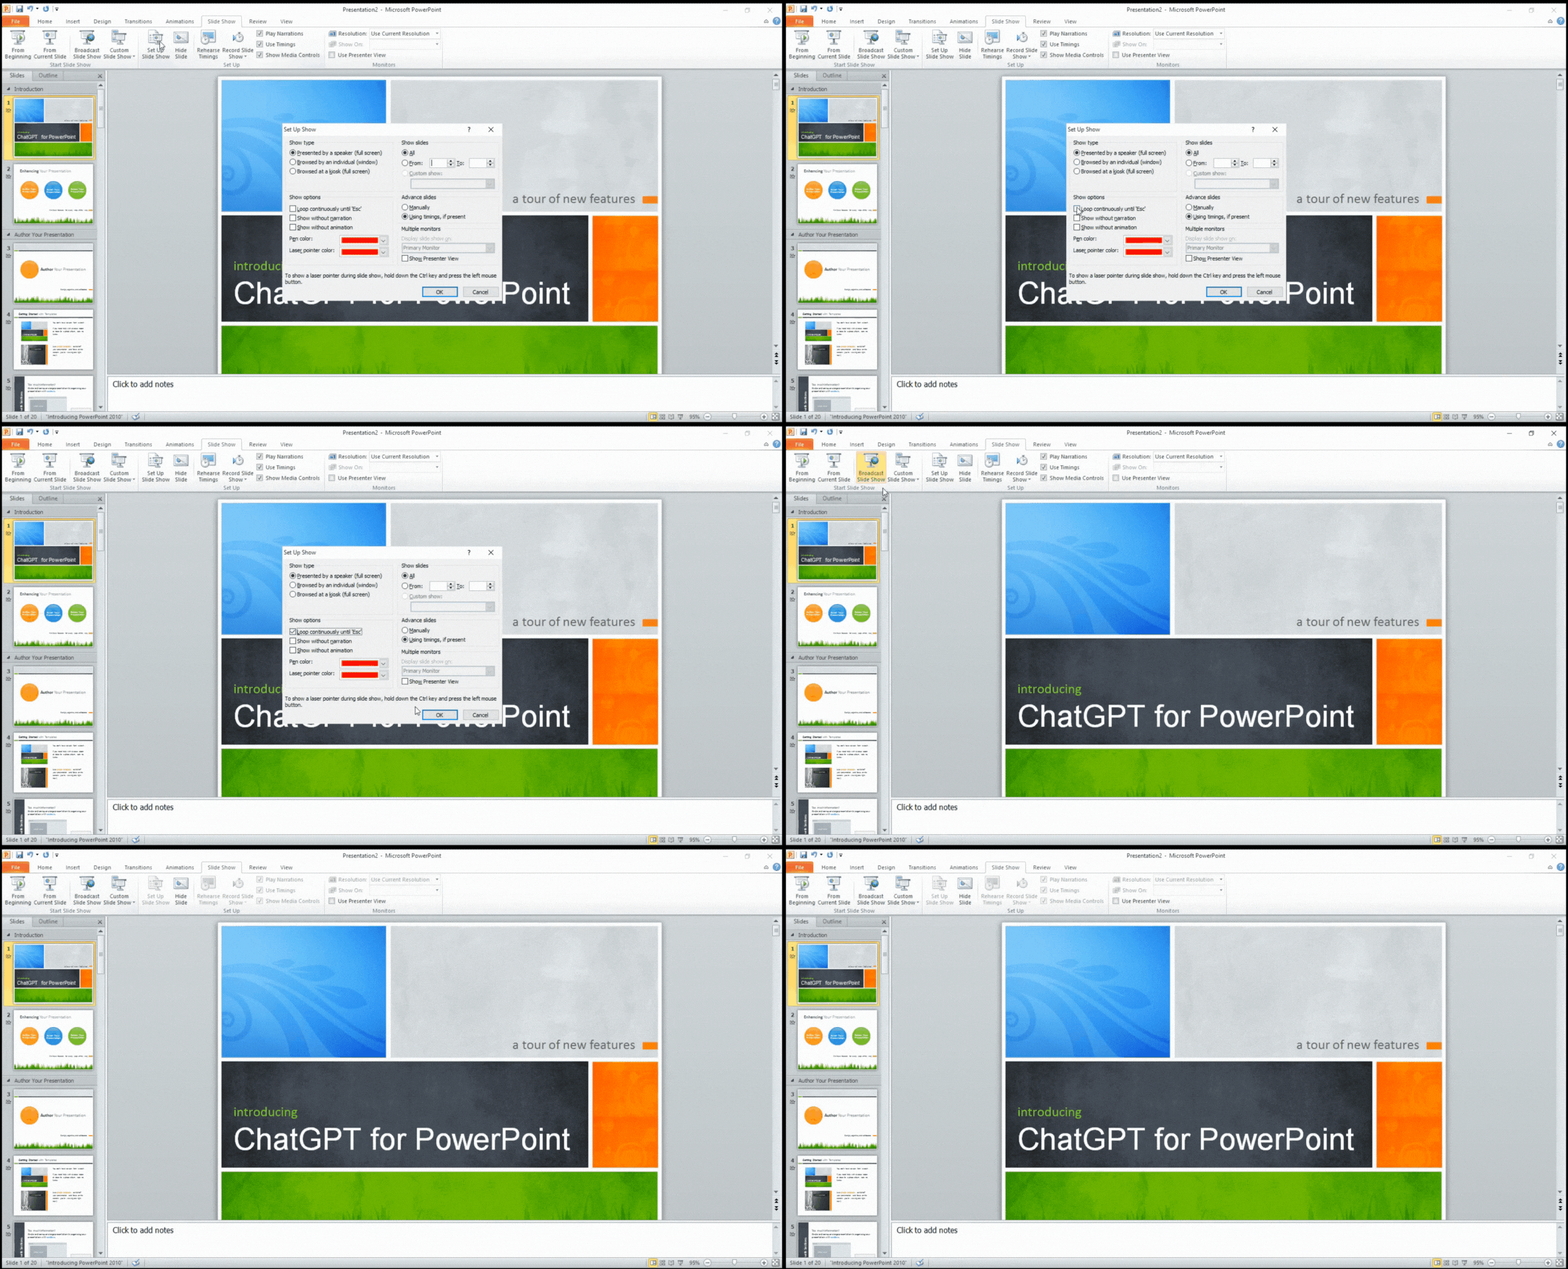
Step 1: Go to the Slide Show Tab
Is your PowerPoint presentation ready for display? Once all slides are ready, open your file and go to the “Slide Show” tab from the top menu.

Step 2: Set Up Slide Show
The 5th option from the left reads “Set Up Slide Show,” which allows you to create an automated play of all slides in the presentation. A new window will pop up where you can make different changes and adjustments.

Step 3: Loop the Slides
Depending on your requirements, you can choose different options. For continuous playback, choose the “loop continuously until Esc” check box from the “Show Options” tab.
Step 4: Make Changes as needed
Try different available options to make the content delivery smoother. For example, you can change the slides automatically or set a specific timer for them to change.
Step 5: Loop Selected Slides only
Do you want to set only a few slides for the loop? In the popup window, enter the starting and ending number of slides in the boxes using the “Show Slides” option. Another way is to select the slides by pressing the Shift button on your keyboard and then loop continuously until the Esc option.

Step 6: Finalize and Start Slide Show
Once all settings are done, save the changes and start the slide show by choosing either the “From Beginning” or “From Current Slide” options from the menu. The slides will be displayed in full screen, looping until you press Esc to end the loop.
Benefits of Looping a Presentation
Why would someone want to make a loop for a presentation? There are situations when the presenter cannot manually control the pace of slides. If a presentation is supposed to run for three hours, can someone be there for three hours to change slides?
There is no need to be there for three years when Loop can handle everything. Here are some scenarios where you can enjoy the benefits of looping slides in a PowerPoint presentation.
Automated Slide Display
When you need the presentation slides to run without human input, looping is the best way to automate the presentation.
Did you see limited ads running again and again at the bus station? This is the perfect example of a looped presentation. The same goes for displaying slides at trade shows, events, shops, and meetings.
Paced Content Delivery
During lectures, professors set the presentation to a slide show so that slides can change after a designated time. This allows the presenter to focus on explaining the onscreen content instead of worrying about changing slides repeatedly.
Undivided Attention Grab
In a slide show, slides are displayed on full screen for most devices. Without displaying unnecessary data and content, viewers can focus only on the current slide. In restaurants, if a slide has menu items, you don’t want the customers to worry about running promotions. Loops are the best option for continuous attention grabbing.
Automation in PowerPoint Presentations
Looping a presentation is a useful automation application in PowerPoint. However, only a few features can reduce manual input. Do you want to take automation to the next level? Do you want maximum and optimized output with the least manual input?
Apps Do Wonders brings the promising ChatGPT for PowerPoint Add-in for personal and professional use. This futuristic add-on creates amazing presentations within minutes using the power of AI. There are a whole lot of images and visual libraries available for you to improve your presentations with AI.
How to make PowerPoint Loop- Conclusion
Navigating PowerPoint to find the right tool is the real game. Useful tools and features are there, and you just need to be creative about using them. If you want to master PowerPoint presentations, explore other useful resources in our blog section.
FAQs- How to Loop a Presentation?
How do I make PowerPoint autoplay?
When you make a loop for all or selected slides, the presentation starts playing in auto mode. In other words, a slide show on a loop is autoplay for presentations.
How to make a presentation loop continuously?
For a continuous loop, check the “loop continuously until Esc” option from the setup slide show window. The presentation will restart once all slides are complete.
How do I loop a slide in PowerPoint with timing?
The new popup window allows users to set the time for each slide. A new slide will appear after the defined time period.
Start Making AI Presentations in Seconds
Instant Access
Begin exploring Twistly’s full suite of features immediately
No Commitments
No credit card required, and you can cancel anytime
Dedicated Support
Our team is here to assist you every step of the way during your trial.

