


Creating a Glassmorphism effect in PowerPoint may seem hard, but the process is worth following. The frosted glass effect is quite a popular concept in presentation designs and user interface designs. We will create Glassmorphism in PowerPoint using soft borders, blur, transparency, and other features of PowerPoint.
If you don’t know what the Glassmorphism effect is, you probably have already seen it on MacOS, Windows, and other modern interfaces. Without using any complicated tool like Adobe or Figma, we will create Glassmorphism in PowerPoint by using simple tools.
Note: Keep in mind that the output of your efforts may not be perfect in the very first attempts, but you will eventually get there. So, keep practicing and keep visiting Twistly Blog for other great PowerPoint guides and tutorials.
What is Glassmorphism in PowerPoint?
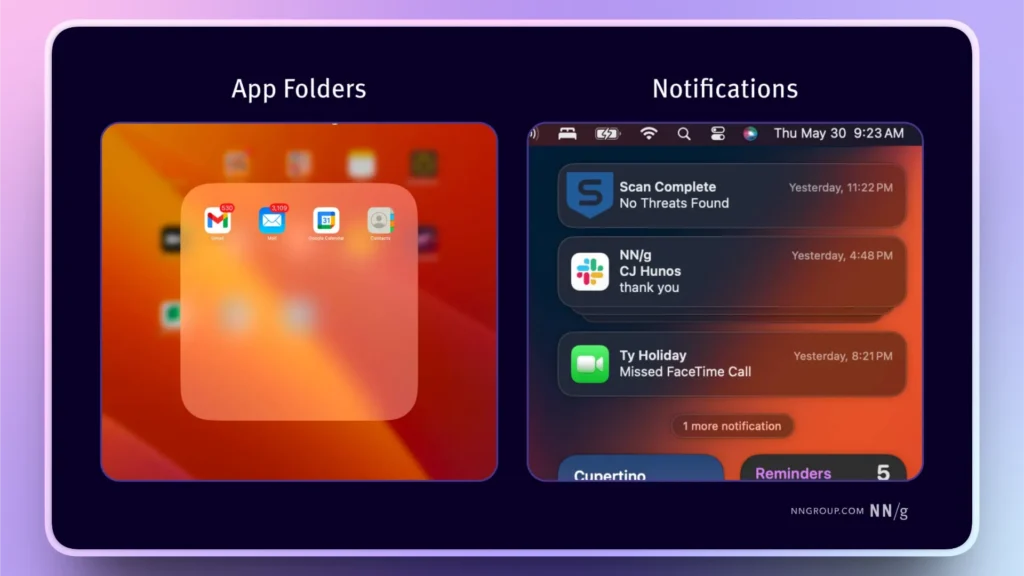
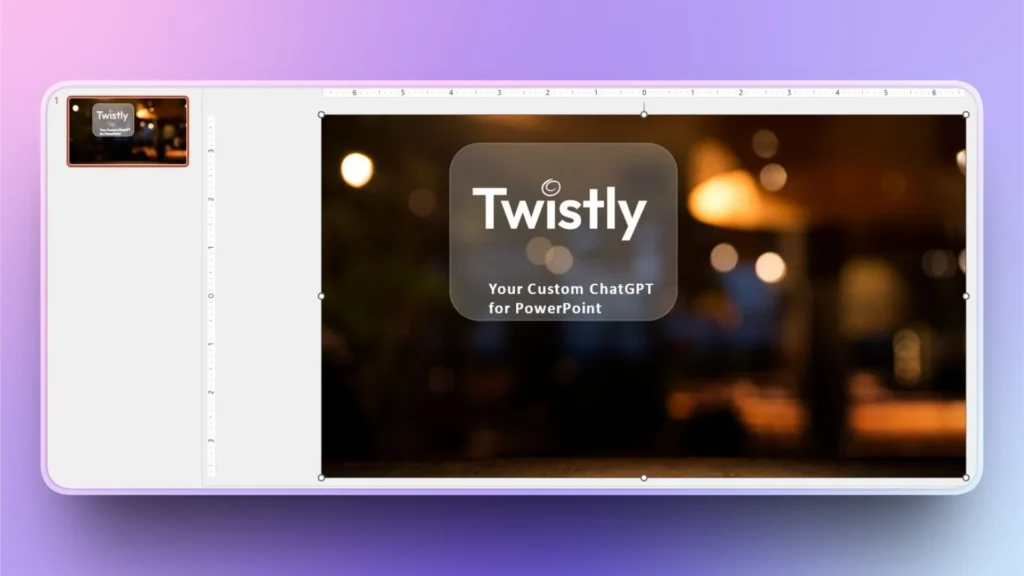
The idea of the Glassmorphism effect in PowerPoint is like other platforms or programs, as this effect mimics a translucent glass surface layered over a colorful background. A professionally designed Glassmorphism effect may look like the image below.
Soft shadows, transparency, and some other features of PowerPoint are used to create glassmorphic effects in PowerPoint. Let’s start with the detailed steps on how to achieve this milestone in your PowerPoint journey.
Creating Glassmorphism in PowerPoint
You can find many tutorial videos on YouTube explaining the process of creating Glassmorphism in PowerPoint. In this tutorial, we will keep things simple for the audience so they can easily follow step-by-step instructions to get the desired results.
Our step-by-step guides are designed to be beginner-friendly, and we also add visuals to make the process easier to follow. So, let’s get started with the amazing stuff.
Step 1: Add a Blurred Background
Glassmorphism works best if you have a blurred background or a gradient background. We will add a blurred background image for this tutorial.
You can still choose different gradient colors according to your choice.
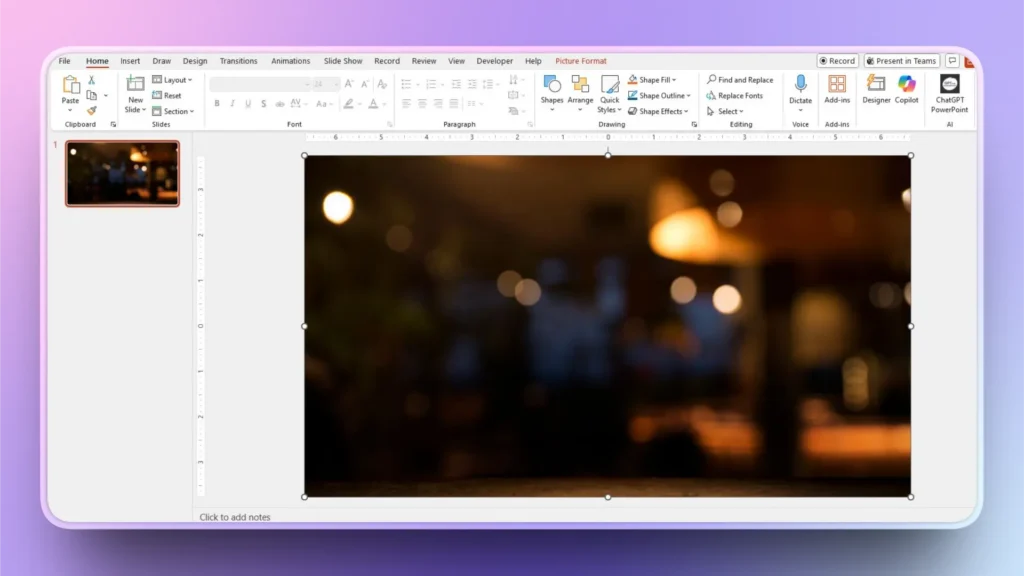
Step 2: Insert a Shape
We need a shape that will act like a glass panel. We will use a rounded rectangle for a more defined glass effect. Go to Insert and then draw the shape on your background.
Step 3: Apply Transparency
Select the rounded rectangle and go to Shape Format >> Format Shape. Under the Fill section, choose Solid Fill. Make changes as given below:
- Color: White or very light gray
- Transparency: 70%–85%
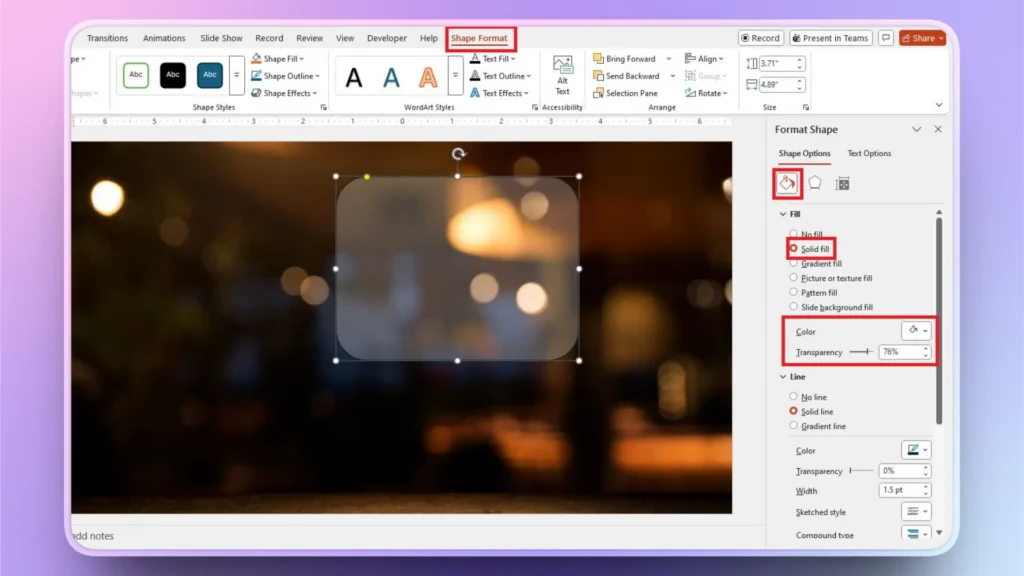
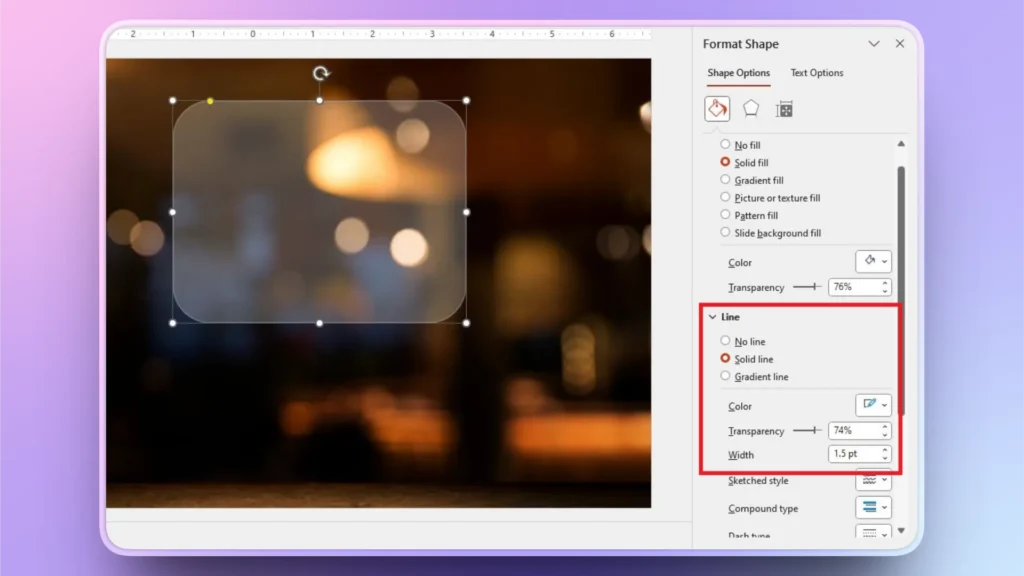
Step 4: Add a Soft Border
Now, go to the Line option in the Format Shape in the right screen. We will now create a reflective edge of the glass. You can set:
- Color: White or light gray
- Transparency: 60%–80%
- Width: 0.5–1 pt
Step 5: Add a Shadow
For a more detailed effect, we will add a shadow to the glass panel for depth. In the Shape Format tab, go to Effects >> Shadow >> Outer >> Soft Shadow. Now, set the values to:
- Transparency: 60%–80%
- Blur: 15–30 pt
- Distance: 3–6 pt
Step 6: Add Text or Icons
Your glass panel is ready, which mimics the Glassmorphism effect on PowerPoint. The next step is to add text, icons, and other elements to your glass panel.
There are further advanced steps and methods to make the glass panel more responsive, but leave that for experts. Once you achieved this level of effects in PowerPoint, mastering further advanced shapes will become easier for you.
Why Create Glassmorphism in PowerPoint?
Making your PowerPoint presentation unique and attractive is the dream of every user. There are online templates and themes available, but they take away the freedom of customization.
For a more personalized experience, creating these effects can be a great way to improve audience engagement. This effect can be a great visual tool for:
- Product presentations
- Startup demos and pitch decks
- Modern UI/UX concepts
- Reports and advanced dashboard layouts
Glassmorphic effect adds a premium and modern look to your presentation. Without clutter, you can help shift the focus of the audience to the most important points.
If you have not used this effect in your presentations yet, follow these simple steps to create Glassmorphism in PowerPoint.
How to Simplify PowerPoint Presentations with AI?
If you are a new PowerPoint user or use PowerPoint more often for work or personal projects, these tutorials might seem too complicated to follow. Even in 2026, creating a basic presentation in PowerPoint can take hours, manually.
But we have managed to reduce the hours of work to just a few seconds with Twistly. What is Twistly, and what can you do with Twistly? Let’s review one of the best AI presentation makers in 2026.
What is Twistly?
Twistly is an add-in for PowerPoint that you can install directly in your PowerPoint software from the official website of Twistly, Microsoft AppSource, or the add-in library.
It lives inside PowerPoint, so you don’t need to switch between different apps or websites.

It is just like ChatGPT for PowerPoint, as the advanced AI models of Twistly allow users to:
- Make presentations from topics, AI prompts, documents, or text
- Add slides with AI, in a few clicks
- Create slides with automatic layout designs, formatting, images, and other elements
- Generate custom images for slides or find relevant images from free stock image sites
- Improve or edit existing presentations with AI
- Perform other useful actions with AI within seconds that take hours manually
How to Get Twistly for Free?
For PowerPoint users, Twistly is the most useful add-in that brings ChatGPT-like capabilities for presentations. It is a paid tool, but for our readers, they can grab the free trial version of Twistly by using the link below.
This trial version will give you a real-time experience of all premium features without spending any money.
But beware, this trial version will end soon, and you will happily upgrade to the full and premium version, just like thousands of other happy users in the Twistly family.
Create PowerPoint Slides with AI
Build AI-powered presentations from any prompt, doc, or video

Conclusion
You can create Glassmorphism in PowerPoint by using a blurred image, transparency, shape, and other basic features, by following these steps.
If you are tired of spending hours on every simple edit or element of PowerPoint presentations, download Twistly and create instant presentations with AI.

Start Making AI Presentations in Seconds
Instant Access
Begin exploring Twistly’s full suite of features immediately
No Commitments
No credit card required, and you can cancel anytime
Dedicated Support
Our team is here to assist you every step of the way during your trial.