

While footers may not be necessary for every PowerPoint presentation, they can be extremely useful for some. For example, they are perfect for slide numbers, dates, your name or a discreet logo. Whether you’re wondering how to add a footer in PowerPoint, want to edit it mid-presentation or are looking to just delete one entirely, this guide covers the full workflow. We’ll show you how to edit PowerPoint footers, and once you know, you’ll be prepared to use these whenever it makes sense in the future.
Why Would You Need a PowerPoint Footer
Still not sure if you need a footer but are wondering why you might want one? Here are some examples to show why a footer can be helpful.
- Navigation – Slide numbers let your audience know their place.
- Context – Dates help you avoid presenting outdated content.
- Branding – Name, title or company details keep things professional.
- Citations – Ideal for academic or research-heavy presentations.
How to Add a Footer in PowerPoint
Now, with that out of the way, let’s dive into what you need to do to add a footer, and then we’ll also look at making edits to that footer.
Insert the Footer
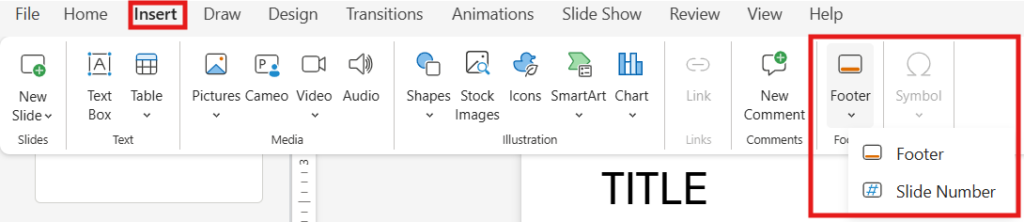
- Open your deck, go to Insert > Header & Footer in the Text group.
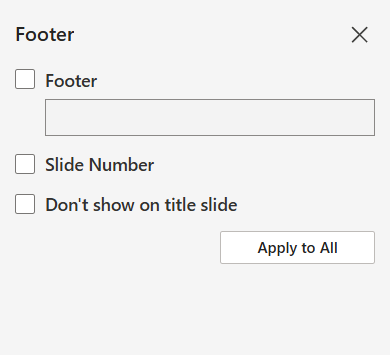
- In the dialog box, check Footer, then type your desired text.
Add Extras (optional)
- Slide number, date/time.
Apply It
- Apply to All will place it on every slide.
- Apply only affects the selected slide.
Now you’re displaying consistent info across your presentation. But keep in mind, these steps are for the desktop app. If you’re working out of PowerPoint Online, things might be slightly different, but you’ll still find the Footer button in the same general location.
How to Edit a Footer
Want to tweak what’s in that footer? Here are your options:
Quick Edit via Insert Menu
- Go to Insert > Header & Footer to adjust text, date format, etc.
- Click Apply to All or Apply for one slide.
Edit Footer in Slide Master (Best for Customizing Style or Position)
- Go to View > Slide Master.
- In the left pane, select the master slide or specific layout.
- Edit, move or delete placeholders for footer, date or slide number.
- Format with fonts, colors or resize boxes.
Footers can also be edited as simply as text boxes, by simply clicking into the footer and editing the text you want to change. This can be useful for slight text tweaks applying to a single slide, whereas broader changes or changes not specific to editable text can be done via the methods above.
[More from Twistly: How to Align Text Boxes Like a Pro in PowerPoint]
How to Delete a Footer in PowerPoint
If you’ve decided you don’t want a footer on your PowerPoint, it can be just as easy to remove it.
- Open Insert > Header & Footer, uncheck Footer (and date or slide number if present).
- Click Apply to All (or Apply for a single slide). This removes the placeholders but sometimes not the text boxes.
Note: While these steps work for the PowerPoint desktop app, PowerPoint Online does not have Slide Master functionality and may generally have more basic footer features.
Troubleshooting Common Footer Issues
Like anything else in PowerPoint, you might run into problems. Here are some common issues and what you can do about them.
Can’t edit footer text directly…
You’re likely seeing a hidden placeholder controlled by Slide Master. Edit via View > Slide Master to unlock and change it.
Footer deleted but reappears…
You probably unchecked it manually in the dialog but didn’t delete it in the Slide Master. Fix it there.
Only want it gone from first slide…
Use the Insert > Header & Footer dialog on that slide, uncheck footer/date/number, and select Apply.
When to Add, Edit, or Delete Footers
You may run into scenarios where a template you are using has a footer and you aren’t sure whether to use it or not. Or perhaps your PowerPoint doesn’t have a footer, but you’re wondering if you should add one. Consider your audience, first and foremost, and then use this simple guide below to determine what the best approach would be.
| Scenario | Best Approach |
| Add company date or slide numbers | Use Insert > Header & Footer |
| Adjust style, font or placement | Use Slide Master to edit |
| Remove footer from title slide only | Use Insert dialog on that slide |
| Remove footer from entire presentation | Slide Master deletion |
Footers don’t have to be an afterthought. Whether you’re adding informative slide numbers, removing clutter or branding every slide, understanding how to add, edit and delete footers in PowerPoint keeps your presentation tidy and professional. It might also be considered a best practice for certain industries, companies or in academia.
Need more help with PowerPoint? Just check back to our blog for regular tips, tricks and how-to guides that can take you from being a PowerPoint novice to a pro. Or, if you’d rather not put in the effort, you can always use our Twistly add-in to bring the power of AI to your slides, offering fast slide creation, professional design and the ability to make tweaks in mere seconds.
Create PowerPoint
Slides with AI
Build AI-powered presentations from
any prompt, doc, or video


Start Making AI Presentations in Seconds
Instant Access
Begin exploring Twistly’s full suite of features immediately
No Commitments
No credit card required, and you can cancel anytime
Dedicated Support
Our team is here to assist you every step of the way during your trial.