


You’ve spent an hour tweaking your PowerPoint slides. The text looks good, the colors are solid, but… something still feels off. Maybe one title is too far to the left or another paragraph is just barely drifting upward. With all the moving parts from designing your slides, things just aren’t fitting together.
If your slides are starting to resemble a ransom note more than a presentation, you’re not alone. Alignment is one of those small details that can make a big difference. Thankfully, PowerPoint gives you some easy tools to fix it fast. We’ll show you how to align your text boxes in PowerPoint so that all your slides look picture perfect.
After all, aligning text boxes isn’t just about making your slide look nice (though it does help with that). It’s also about making your content easier to read and understand. Clean alignment helps your audience process information quickly, which means fewer distractions and more impact.
Now, let’s dig into how to align text boxes in PowerPoint.
Aligning Text or Other Objects in PowerPoint
There are a few different ways of going about this, so we’ll outline each option. Keep in mind that PowerPoint treats text boxes like any other objects, such as pictures or shapes, so you’ll be able to use the same processes for aligning other objects within your PowerPoint slides (though sometimes with some slight differences).
1. Use the Align Tool
PowerPoint has a built-in align feature that does most of the work for you.
Here’s how to use it:
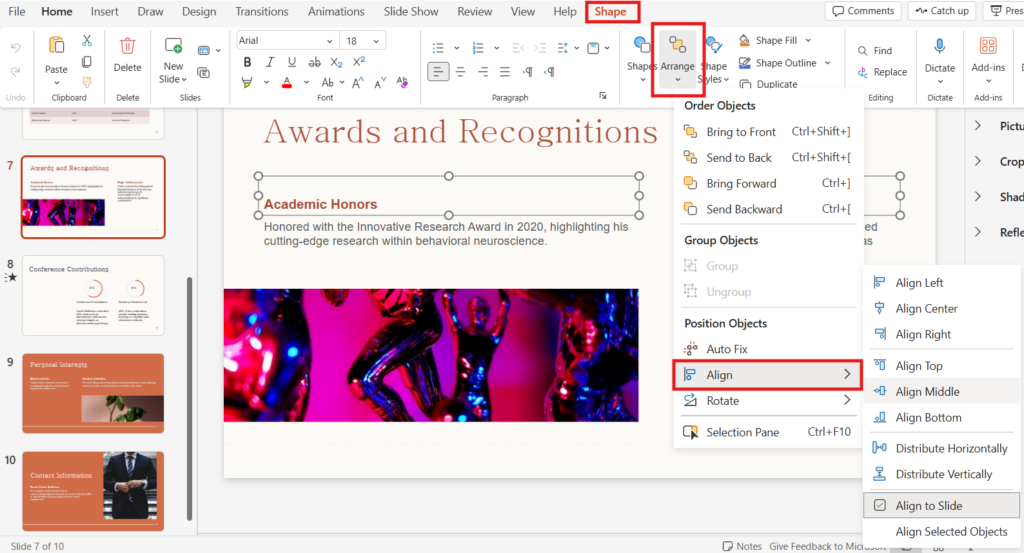
- Select the text boxes you want to align (hold Ctrl and click each one).
- Go to Drawing Tools and click the Format tab.
- Click Arrange, then choose Align.
- From here, you can pick options like Align Left, Align Center, Align Right, Align Top, Align Middle, or Align Bottom.
Want everything spaced evenly too? Use Distribute Horizontally or Distribute Vertically—those two are lifesavers when you’re working with multiple boxes on the same slide.
2. Use Smart Guides
Smart Guides are the red dashed lines that appear when you move objects around. They help you line things up manually but with a little visual assistance.
To make sure they’re on, do the following:
- Click View in the ribbon.
- Check Guides and Smart Guides if they aren’t already selected.
Now when you move your text boxes around, PowerPoint will snap them into alignment with nearby objects.
3. Snap to Grid for Precise Positioning
If you want more precision, grids are a great tool to use.
- Go to View > Grid and Guides.
- Choose Snap objects to grid and adjust the grid settings if needed.
This is great when you want consistent spacing slide-to-slide, especially for team templates or branded decks.
[READ MORE: How to Track Changes in PowerPoint]
How to Align Text in PowerPoint Online
The above steps might work OK for the desktop version of PowerPoint, but online is going to be a bit different. The big difference is that instead of going to Drawing Tools and then Format, you’re going to do the following:
- Select the shapes you want to arrange
- Under the Shapes tab, select the Arrange button.
- Under the Arrange menu, you can select how you’d like to align the selected text boxes (or other objects).
When your slides are polished, your message shines through without distraction. Whether you’re presenting to a class, a client, or a boardroom, taking the extra minute to line things up makes a difference. If you’d rather not worry about all this, you can always use our Twistly add-in so that AI can design the slides for you!
Create PowerPoint Slides with AI
Build AI-powered presentations from any prompt, doc, or video


Start Making AI Presentations in Seconds
Instant Access
Begin exploring Twistly’s full suite of features immediately
No Commitments
No credit card required, and you can cancel anytime
Dedicated Support
Our team is here to assist you every step of the way during your trial.