


In a professional PowerPoint presentation, every little detail matters. When you are pitching an important idea, you cannot afford even the smallest mistake, like a picture in the wrong direction. The image you added an image that is facing the wrong way, and you need to flip it.
There is no need to take and upload new pictures. We will teach you how to flip a picture in PowerPoint. You can rotate the text box in PowerPoint, not only an image. Stay with us if you want to find effective methods to make professional presentations.
How to Flip a Picture in PowerPoint?
The method to rotate or flip an image in PowerPoint is similar as both options are available in the same tab. In PowerPoint, there are different tabs that offer group of options for every element. One tab may offer options related to adding media, one for styling text and another for making changes in the images in the presentation.
The easiest way to master PowerPoint is to closely observe the top menu bar as it has unlimited options to style and modify a PowerPoint presentation. In this section, we will focus on two common methods to flip a picture in PowerPoint.
Method 1: Flip a Picture in PowerPoint via the Format Tab
Just like making any other change to an image in a presentation, you need to add the image to your PowerPoint file. Once you have the image that you want to change, rotate, or flip, follow these steps.
Step 1: Open PPT and Select Image
Go to the slide with the image and click on the picture and a new picture tool, “Format” will appear.

Step 2: Format >> Rotate
Click on the Format tab, and new options will appear in the menu. Navigate to the Arrange section and then click on the “Rotate” option.
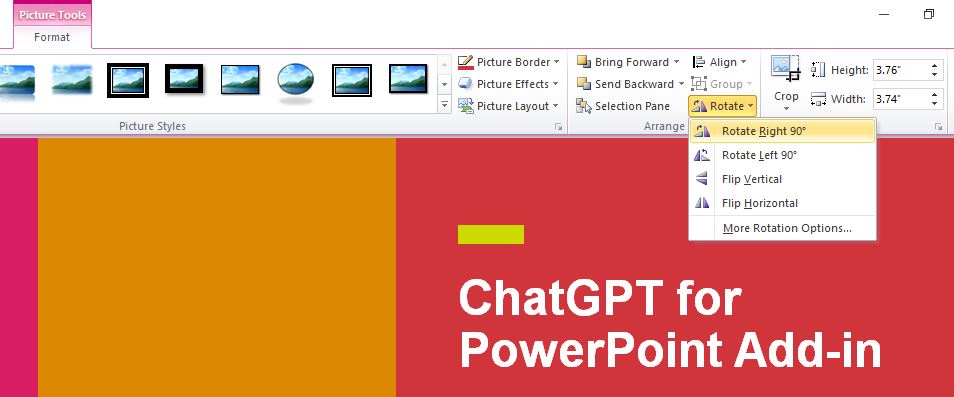
Step 3: Flip or Rotate Image
A drop-down menu will appear from where you can find different options, including:
- Rotate Right 90°
- Rotate Left 90°
- Flip Vertical
- Flip Horizontal
This way, you can make any change to your image in PowerPoint. These simple methods allow you to flip a picture in PowerPoint or rotate an image in PowerPoint.
Method 2: Flip or Rotate an Image by Dragging
There are different methods and ways in PowerPoint to do the same thing. You can either use the method 1 to rotate and flip an image or follow the simple steps to flip an image via dragging the corners.
This is relatively easier and faster method to flip a picture in PowerPoint? Which one did you like and why? Let’s see how it’s done.
- Select the image in the slide, and rotation handles will appear on the corners of the image.
- Click on any corner or side of the image and then start dragging in the opposite direction.
- Keep dragging until you have a rotated or flipped image
How to Flip a Text Box in PowerPoint?
Same flip and rotate options are available for any text box also. Styling headings and other subheadings in different ways may make your presentation more appealing.
Method 1: Flip a Text via Format Tab
Just like flipping an image, select the text box, go to the Format tab, and then choose the right flip or rotate option. The same process to flip an image applies to flipping a text box in PowerPoint.
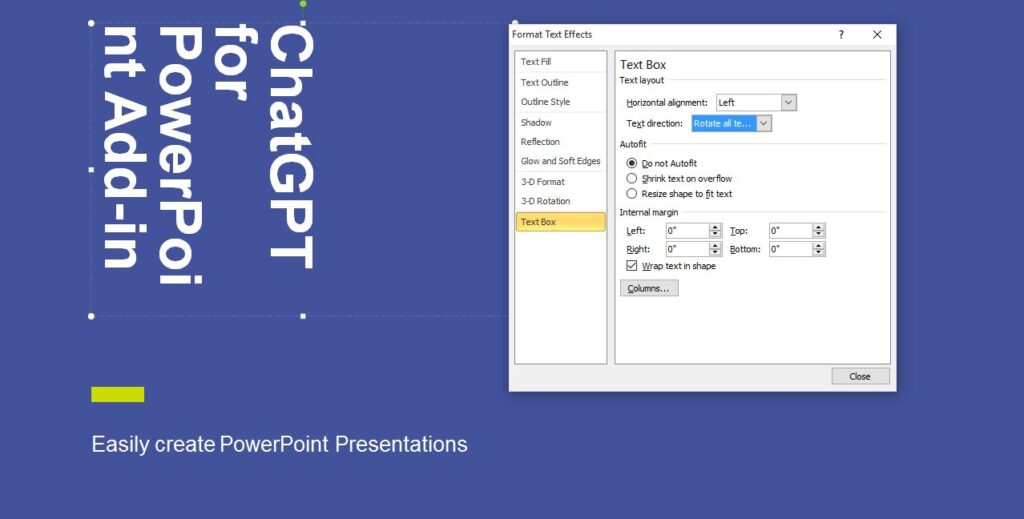
Method 2: Flip a Text Box with Right-click
Select the text box and click right mouse button and from the menu, choose “Format Text Effects” heading. A new window will open from where you can rotate or flip text box easily.
Rotating any Object in PowerPoint
Everyone has unique style or presentation template in mind. Trying different styles to an element can give you the desired results. Users can rotate other elements like clip art, icons and headings. The process of flipping and rotating any element or object in PowerPoint is same.
You can either flip an object via the Format tab for that object or by choosing from the menu by clicking on the object.
How to Make Professional Slides with AI?
Are you tired of buying expensive templates or designing every slide from scratch? Manual slides can take time and not everyone is good at designing stuff. You are not alone in this situation and we have the right solution for our readers.
ChatGPT for PowerPoint is a powerful add-in for PowerPoint presentations. This tool allows users to design and create slides from scratch with simple prompts only. It is just like using ChatGPT to get answers. You only need to type a command to create or style a presentation and ChatGPT for PowerPoint will get it done in professional way.
Enhance Your Slides with AI for PowerPoint.
Instantly generate content and ideas for presentations with ChatGPT for PowerPoint— Get Add-in Microsoft AppSource for free today.
Try for free
Flip a Picture in PowerPoint- Final Words
The easiest way to flip a picture in PowerPoint is to drag it from one side to another, but using the Format tab also offers many options. Explore this guide to learn how to rotate images, text boxes, and objects. Don’t forget to see how ChatGPT for PowerPoint can help you convince your audience with immersive presentations.
Frequently asked questions


Start Making AI Presentations in Seconds
Instant Access
Begin exploring Twistly’s full suite of features immediately
No Commitments
No credit card required, and you can cancel anytime
Dedicated Support
Our team is here to assist you every step of the way during your trial.